Network License Trade-in Offer
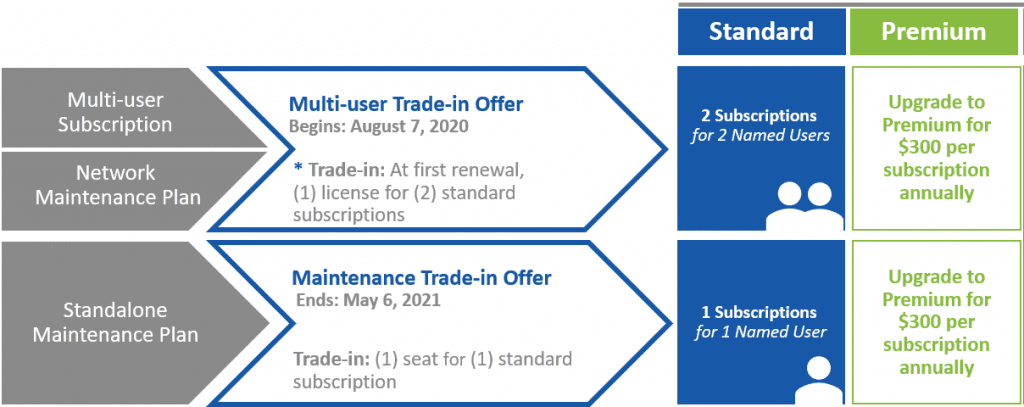
From August 7 2021, Autodesk are no longer renewing Multi-user Subscriptions.
From May 7 2021, Autodesk are no longer renewing Network Maintenance licenses.
Key Points
- Trade-in one multi-user subscription or network maintenance seat for two standard subscriptions, for one named user each, at a similar price you’re paying today for your existing seat or subscription.
- For example, if you have 20 multi-user subscriptions, you can trade them in for 40 Single-user subscriptions at a similar price to what you’re paying today.
- Then, renew at an ongoing discount to 2028*.
- At time of trade-in or later, choose to upgrade to a Premium plan for more advanced features, such as single sign-on and detailed user reporting.

We strongly recommend discussing your Trade-in options with us, to ensure you get the best value for money.
Step 1. Create new users in the Autodesk Manage Portal
- Sign in to your account at manage.autodesk.com and click User Management > By User in the left navigation menu.
- Click the Invite Users button. If your users are organized by team, select the appropriate team from the drop-down list.
- Select Invite Multiple
- Copy / Paste the user’s first and last name and email address from Outlook
- Click Send Invite.
Step 2. Import Bulk Users
-
Prepare a CSV file listing the users you want to import.
-
Add a single row for each user.
-
Add three columns – First name, Last name, and Email address.
-
You can add up to 5,000 users.
-
Users that already exist in your team are ignored.
-
Sign in to your account at manage.autodesk.com and click User Management > By User in the left menu.
-
Click the Invite Users button. If your users are organized by team, select one from the drop-down list.
-
Select the Import tab and click Upload CSV file. You can continue working while the file is uploading. A notification displays when the import is complete.
-
When the upload is complete, click Continue.
The user’s status displays as pending until they accept the invitation. They will not have access to any products or services until you assign them. -
Step 3. Assign Users, By Product
-
Select a product to view details.
-
Click Assign users.
-
Enter the user’s email address and:
-
Click Assign, to assign all product items, or
-
Click Customize to select individual items.
Step 4. Assign Products, By User
- Sign in to your account at manage.autodesk.com and click User Management > By User.
- Select a user to view products that can be assigned to them.
- Select a product.
- To assign all the product’s items, click Assign.
- To customize which product items to assign, click the arrow next to Assign. Select the applicable items and click Save changes.
Step 5. Switch Products from Network to “Sign In”
- Start your Autodesk software.
- At the upper-right, click the triangle next to the username.
- Select Manage Licenses.
- In the License Manager dialog box, select Manage License Type. The Let’s Get Started screen appears.
- Choose “Sign In” and enter your Autodesk Account email and Password.
Step 6. Configure your Autodesk license usage across a network
System administrators can update all devices for all users with an automated tool that changes the license type for 2017 and newer products. To run the tool, users must be able to connect to the corporate network.
Download the Guide here.
Here’s a bonus video on accessing User Analysis in your Autodesk Manage Portal:
Autodesk Disclaimer:
*Actual pricing may vary due to the impacts of currency fluctuations. Pricing commitments apply only to seats moved to subscription from maintenance pursuant to the Move to Subscription offer. This price commitment is subject to product and/or offering availability and does not apply to new subscriptions purchased by customer; switched subscriptions (i.e., permitted switches from a subscription for one product to a subscription for another product), or substitute or successor subscription products.


